Meet the MJ401C
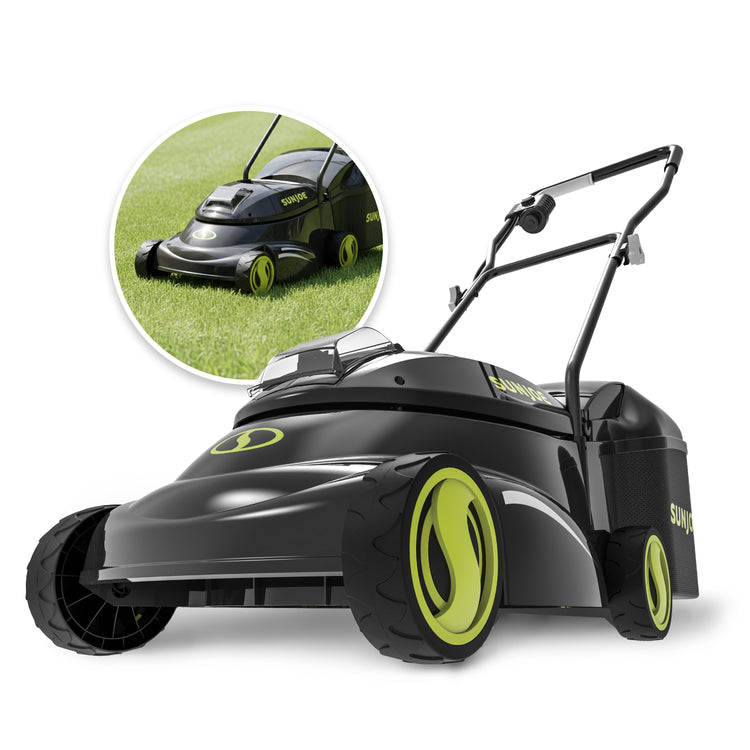
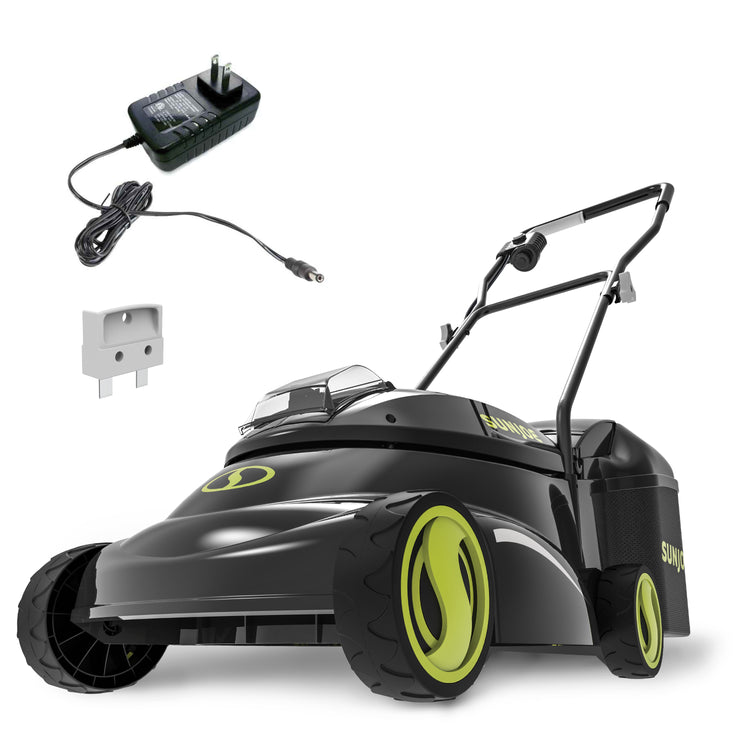

Key Components
Switch lever — squeeze to run the mower after pressing the safety lock button
Safety lock button — helps prevent accidental starting
Safety key — must be inserted before operation and removed before maintenance
Battery capacity indicator — shows remaining battery charge under the gauge cover
Charge socket — connects the included iCHRG28-AC charger
4 wheels — each wheel axle adjusts to low, medium, or high cutting height
Steel blade — 14-inch cutting path for residential mowing
Grass collection bag — 10.6 gal / 40 L clipping collection capacity
Ejector flap — helps secure the grass collection bag during use
Handle knobs + bolts — secure upper and lower handle assembly
Cable clips — keep the control cable secured to the handle
iCHRG28-AC charger — charges the mower battery in up to 4.5 hours
Technical Specifications
| Specification | MJ401C |
|---|---|
| Product Type | Cordless walk-behind lawn mower |
| Best Use | Private residential grass cutting in small lawns and gardens |
| Motor | 600 W brushless |
| Battery Voltage Max | 28V D.C.; initial no-load voltage peaks at 29.4V when fully charged |
| Battery Capacity | 4.0 Ah |
| Charger Model | iCHRG28-AC |
| Charger Input | 100–240V AC, 50–60 Hz, 0.8A |
| Charger Output | 29V DC, 0.9A |
| Battery Charge Time Max | 4.5 hours |
| No Load Speed | 3000 rpm |
| Cutting Width Max | 14 in. / 35.6 cm |
| Cutting Height | 1.2 in. to 2.5 in. / 30 mm to 64 mm |
| Height Positions | 3 positions: low, medium, high |
| Grass Bag Capacity | 10.6 gal / 40 L |
| Blade Material | Steel |
| Wheel Size | 5.5 in. / 14 cm |
| Net Weight | 23.1 lbs / 10.5 kg |
| Warranty | 2 Year Warranty |
What's in the Box
| Included Item | MJ401C |
|---|---|
| Cordless lawn mower | ✔ |
| Grass collection bag | ✔ |
| Grass collection bag support rod | ✔ |
| Upper handle | ✔ |
| Upper handle knob and bolt assembly | ✔ 2 included |
| Lower handle | ✔ |
| Lower handle screws | ✔ 2 included |
| Screws | ✔ 2 included |
| Cable clips | ✔ 2 included |
| Battery charger | ✔ |
| Manual | ✔ |
Before You Mow
Assembly
-
Attach the lower handle
Fit the lower handle into the two holes in the mower body and fasten both sides with the provided screws.
-
Attach the upper handle
Join the upper handle to the lower handle using the knob, plastic washer, and bolt. Repeat on the opposite side.
-
Assemble the grass collection bag
Fit the support rod into the holes in the plastic cover. The bend of the support rod should face the rear of the mower.
-
Install the grass collection bag
Lift the ejector flap with one hand, hold the grass bag by the handle, hook it in from above, then release the ejector flap to secure the bag.
Charging the Mower
-
Connect the charger to an outlet
Plug the charger into an appropriate AC power outlet.
-
Connect the charger to the mower
Connect the charger plug into the mower charging socket to begin charging.
-
Check the charger light
The charger LED illuminates red while charging.
-
Unplug when fully charged
The battery takes up to approximately 4.5 hours to charge. When the LED turns green, unplug the charger from the outlet and mower.
Battery Indicator Guide
| LEDs Illuminated | Battery Condition |
|---|---|
| Green, Yellow, and Red | More than 60% charged |
| Yellow and Red | More than 30% charged |
| Red only | Less than 30% charged; recharge before continued use |
Starting + Stopping
-
Insert the safety key
Insert the safety key into the slot before starting the mower.
-
Raise the front slightly
Hold the handle assembly with both hands and tilt the handle downward to slightly raise the front of the mower. This helps reduce lawn damage during startup.
-
Start the mower
Press and hold the safety lock button, then pull the switch lever toward you.
-
Begin mowing
Once the mower powers on, release the safety lock button and gently lower the mower into the cutting position.
-
Stop the mower
Release the switch lever. Wait for the blade to fully stop before moving, tilting, cleaning, or inspecting the mower.
Cutting Height Adjustment
| Height Setting | Cutting Height |
|---|---|
| Low | 1.2 in. / 30 mm |
| Medium | 1.93 in. / 49 mm |
| High | 2.5 in. / 64 mm |
-
Power off and remove the key
Turn the mower off and remove the safety key from the slot.
-
Remove the grass collection bag
Remove and empty the grass collection bag before adjusting the mower.
-
Place the mower on its side
Carefully place the mower on its side to access the wheel axle positions.
-
Set all four wheels evenly
Move all four wheel axles to the same height position by pulling back on each rod axle and setting it into the correct position.
-
Return to mowing position
Place the mower back on its wheels, reattach the grass collection bag, insert the safety key, and resume normal use.
Mowing Tips
Clear the mowing area first
Remove stones, sticks, wires, toys, and other objects that could be picked up and thrown by the blade.
Slow down in thick grass
Reduce walking speed in thick grass to help improve cutting and clipping discharge.
Follow the one-third rule
For a healthy lawn, cut off one-third or less of the total grass length at a time.
Use safe slope direction
Mow across slopes, not up and down. Do not mow inclines greater than 15 degrees.
Turn off before crossing gravel
Release the switch lever before crossing gravel surfaces to reduce the risk of thrown stones.
Care + Maintenance
Keep the mower clean
After each cutting session, remove grass clippings and debris with a dry cloth or hand brush.
Keep handles dry
Keep the handles dry, clean, and free from oil and grease.
Check hardware before use
Check nuts, bolts, and screws for proper tightness before each use.
Inspect the grass bag
Frequently inspect the grass collection bag assembly for signs of wear or damage.
Blade Care
Check the blade when cut quality drops
If the mower is leaving a rough or uneven cut, the blade may be dull, worn, or damaged.
Minor wear may need sharpening
If the blade is blunt or has minor wear, it may need to be sharpened.
Major wear requires replacement
If the blade is bent, gouged, damaged, or heavily worn, replace it with the correct blade.
Use only the correct replacement blade
The listed replacement blade model is MJ401C-BLD.
Storage
Remove the safety key
Always remove the safety key from the slot before storing the mower.
Clean before storage
Clean the mower with a damp cloth or hand brush and remove grass buildup.
Inspect for wear or damage
Check connections, screws, and the mower blade. Tighten or replace parts as needed before the next use.
Store indoors
Store indoors in a dry, clean, cool area out of reach of children. Do not store next to corrosive materials such as fertilizer or rock salt.
Fold for compact storage
Loosen the handle knobs on each side of the upper handle and fold the upper handle down.
Troubleshooting Guide
Use these quick checks for common MJ401C concerns. Always remove the safety key before maintenance, cleaning, inspection, or checking that parts are in proper working order.
Possible Causes
- Safety key is not inserted
- Motor/blade control is disengaged
- Battery is flat
- Mower deck is clogged with grass or debris
- Grass is too tall
Solutions
- Insert the safety key
- Press the safety lock button first, then pull the switch lever
- Charge the battery
- Remove the safety key and clean the mower deck
- Set the mower to a higher cutting height and raise the front wheels slightly during startup
- If still not working, check warranty eligibility and route to warranty support
Possible Causes
- Battery is flat
- Grass is too tall
- Mower deck is clogged
- Overload protection system switched the mower off
Solutions
- Charge the battery
- Reset the cutting height higher
- Remove the safety key and clean the mower deck
- Allow the mower to cool for 5 minutes before restarting
Possible Causes
- Lawn is rough or uneven
- Blade is not sharp enough
Solutions
- Adjust the cutting height
- Sharpen or replace the blade if cut quality remains poor
Possible Causes
- Mower deck is clogged with grass or debris
- Grass is too wet
- Grass is too tall
- Blade is not sharp enough
Solutions
- Remove the safety key and clean the mower deck
- Wait until the grass is dry
- Set the mower to the high position for the first pass, then mow again at the desired height
- Sharpen or replace the blade
Possible Causes
- Grass is too tall to cut
- Blade or rear of mower is dragging through heavy grass
Solutions
- Adjust the cutting height higher
- Use slower passes in thick grass
- If grass is very tall, mow once on high and repeat at the desired height
Possible Causes
- Motor shaft may be bent
- Blade is unbalanced
- Blade screw is loose
Solutions
- Stop the motor and remove the safety key
- Inspect for visible damage
- Tighten the blade bolt if loose
- Replace the blade if damaged or unbalanced
- Do not continue using the mower if abnormal vibration continues
Possible Causes
- Power failure
- Bad connection between charger plug and charger socket
Solutions
- Check that the charger is plugged into a working outlet
- Reconnect the charger plug securely to the mower charging socket
- If still not charging, route to support
Optional Accessories + Replacement Parts
| Item | Model |
|---|---|
| 10.6-gallon / 40 L grass collection bag | MJ401E-10 |
| Lawn mower side-discharge chute accessory | MJ401E-DCA |
| Replacement blade | MJ401C-BLD |